Monday, January 27, 2014

Le Pot de Papillon


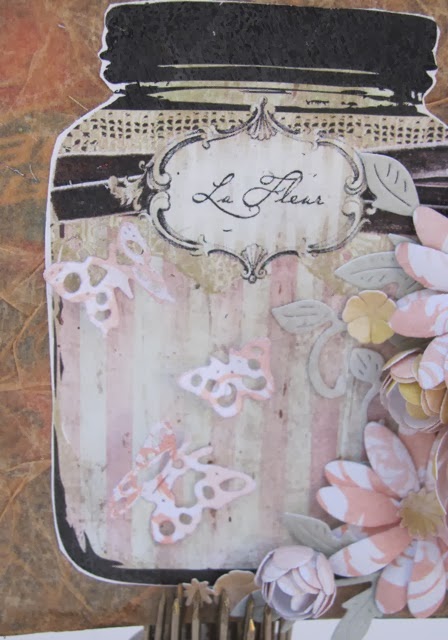
Good afternoon! leslierahye here with an altered coaster : Le Pot de Papillonthe butterfly jar! As an artist one of my favorite things to do is to upcycle cardboard--coasters from restaurants are perfect! Many are about the size of a fat book (4×4") and make wonderful substrates for small art. 

I covered this coaster with 2 layers of Kraft colored Tissue Stock from Canvas Corp using Nori Perfect Paste as my adhesive. I also used the Nori Perfect Paste to adhere the trimmed "La Fleur" mason jar from the Retro Cafe Art Gallery collage sheet. 

I created handmade flowers with the soft subtle Color Wash card stock from Pink Paislee and adhered them to the side of the jar image. I completed the composition by posing mini butterflies in the jar and upon a few flowers. Knotted Wood ink from Prima Marketing Inc. was edged around the coaster to darken the edge a bit.

Products used in the creation of this journal page : 
Vintage French Mason JarsRetro Cafe Art Gallery
Designer Dries Clear—Art Glitter Adhesive
Nori Perfect Paste—Yasutomo
Color Wash cardstock—Pink Paislee
Tissue Stock 12×12 Kraft—Canvas Corp.
Chalk Ink, Knotted Wood—Prima Marketing, Inc.
dies (Mini Fanciful Flourish - B117S, Daisy Strip - B259, Flourish Leaf Strip - B178, Small Heart Lollipop Fringe Cutie - B391, Miniature Rose - B152, Sunflower - DL121, Tiny Flower Kit (Set of 3) - B376 Mini Butterflies w Angel Wings - D138)—Cheery Lynn Designs
coaster, sponge brush


Thank you for stopping by! I hope you enjoyed my altered coaster!

Friday, January 24, 2014

Altered Napkin Collage


Hi, Lea here, bringing you new altered inspirations!  This post will explore the wondrous world of upcycling.

Upcycling is a term for reusing boxes and items normally one would throw away.  Reusing, recycling - important for our planet.   The project below is created using an old wood bangle, napkins, collage adhesive, and other elements.  


 The wood bangle was painted with paint before collaging the separated napkins to the surface.  Napkins are easily separated using painter's tape.  Rip the napkins into usable pieces and collage to wood bracelet.  The beautiful hues of the paint ( I used a mica paint for shimmer) will show through slightly.  Once dry, add beads, a flower, and rhinestone.

TIP:  If you do not have napkins laying around, stamped tissue paper will work as well!  Stampendous! and Stamps On Fire  are great choices for images to use.  I have designed with Stampendous! stamps for many years and they constantly update their images to match the trends happening.

Look before you throw out or add something to the recycle bin.  Think and envision ways you can make art and upcycle items into new things!

I will be posting on the 10th and 24th of each month, bringing you ideas and inspiration!  I hope you find these useful as you travel along your artistic journey.

Cre8tivelea Yours - Lea

Tuesday, January 21, 2014

Altered Birch Magnets


The moment I spotted these birch discs at Michael's, I knew they would be perfect for altered magnets. Add in a collage sheet from ARTchix Studio, and you have a quick and easy project to spruce up your memo board!


Here are the birch discs before altering. So many possibilities! I think these would be sweet for pendants or charms too. I love the little squiggly bits of bark, so I left those, but you can easily snip them off for a cleaner look.

Altered Birch Magnets Supplies by Kimberly Jones

To create some magnets for yourself or a friend you just need a few basic supplies:
*Collage Images - "Lovely Lenses" ARTchix Studio
*Birch Discs
*Sharp Detail Scissors {Or a circle punch if you prefer}
*Gel Medium or Decoupage Medium {I used Liquitex Matte Medium, but any kind will work
*Inexpensive Paint Brush
*Embellishments {rhinestones, beads, buttons, etc.}
*Tacky Glue - "The Ultimate" - Crafter's Pick

Altered Birch Magnets Tutorial by Kimberly Jones

Follow these steps to create the magnets:

*Begin by selecting the collage images you want to use for the magnets.
*Cut or punch out the images to fit on the birch discs.
*Use gel medium to glue the image to the disc and add a coat to the top to seal.
*Add embellishments with tacky glue.
*Add a self-adhesive magnet to the back of the disc.

Some fun alternatives for the collage images would be monograms, buttons or other embellishments, found objects...the list is endless! I hope you enjoyed the tutorial and have fun making your own magnets!

Kimberly


Sunday, January 19, 2014

Inspirational Arizona - Montezuma Castle

Continuing my inspirational Arizona series....in reverse chronological order.  :-)

-------------------

My last day in Arizona was jam-packed with fun! I left Sedona in the AM and stopped at Montezuma castle and Jerome (another blog post) on my way to the Phoenix airport.

Montezuma Castle is one of the first four sites to be declared National Monuments by Theodore Roosevelt. It is a prehistoric cliff dwelling built by the Sinagua Indians who occupied it for more than 300 years.

closeup

castle


This was further down from the castle and is the ruins of another dwelling.


snake

There's a short scenic trail that loops out around the park. This sign was a reminder that nature abounds! Rattlesnakes are common in this area.

After leaving Montezuma Castle, I headed toward Jerome, a must-do for any art-loving person.

~Cyndi

Friday, January 17, 2014

ATCs

Hello!  I'm so happy to be making my first post to the Altered Arts Magazine Blog!!

I made 2 ATCs today, using a paper napkin technique that I wrote an article about for Altered Arts Magazine.
I coated the ATCs with Matte Medium, and placed the napkin face down onto the medium.  The other 2 layers of napkin come off easy that way. Then go over the napkin with another layer of medium and you get a beautiful background!!  I sanded the edges of the ATC, and any loose napkin will come off here.  Then, I went around the outside of them with Prima "Wood" color ink.  I glued on a piece of corrugated cardboard, a distresses a piece of book paper and an inked bit of gauze.  Last was a single mini rose.  I wrapped it up in a nice piece of rope, and I tied it with a bow!

I really hope you enjoy our new blog, and visit us often!!  Tell your friends!  There are exciting things coming soon!  We love your comments!!
Have an awesome day!!
xxDaniella

Wednesday, January 15, 2014

a transfer image pendant

So I've been playing with transfer images again, which is always a good
time, and finished off a bamboo tile pendant piece to show you today:
Collage images from  ARTchix Studio
It's very small, less than one inch across, with a double transfer of the
woman over a background (it's a glossy finish, thus the shine).  Please
tell me you think that background looks like cherry blossoms . . .

:)trisha

Monday, January 13, 2014

Bringing in the new year with a new Art Journal


Good afternoon! leslierahye here to share with you this fun journal page I created using Graphic 45 Staples, Stampendous! Cling Stamps and Retro Cafe Art Gallery collages. This was the first page of my new art journal and I wanted to capture the essence of this journal with my design. In this journal I will be exploring different techniques throughout the year. 

To create this journal I began by misting the background, lifting off with a towel color to achieve the desired look. Once I was happy with the background, I layered on the Castle Gate image with Mix'd Media Inx. I glued down an ATC sized collage image from Retro Cafe Art and added Graphic45 Staples Flowers. A bit more misting helped to tie the new elements into the page. Once the page was dry, I was able to create some doodling and journaling with my charcoal pencil and white prismacolor pencil. I hope you enjoyed my creation! Thank you for stopping by!

Products used in the creation of this journal page : 
Staples Flowers—Graphic 45
Mixed Grunge Stamped CollageRetro Cafe Art Gallery
Cling Castle GateStampendous!
Kunst & Papier Art JournalK & P Imports
Designer Dries Clear—Art Glitter Adhesive
Charcoal Pencil—General
Pencil (white)—Prismacolor
Mist (Antique Copper)—Maya Road
Glimmer Mist (Vintage Pink)Tattered Angels
Dylusions Mist (Black Marble)—Ranger Industries
Mix'd Media Inx by Donna Salazar (Truffles)—Clearsnap


Arty Jerome, Arizona

By Cyndi Duncan

Blogger is new to me...not completely, but I will have to relearn it.  Bear with me as I relearn the program.  Our talented design team will be posting here as well, and they are much more blog-savvy than I.  :-)

Last year, actually a year ago last October, I traveled to Phoenix, Arizona after selling the Mailbox Muse to the owner of Altered Pages.  I went out to go over inventory and train her in how the business and website worked.  After spending time with her in Phoenix, I visited the Grand Canyon, Sedona and also some other fun spots.

I had the following post saved in draft mode on our former blog, but never got around to writing about the first part of the trip.  The whole trip was such a wonderful experience, and all the little arty jaunts I did so much fun, that I want to be sure to share them with you here....

Arizona - Last Day 

I ended my journey with a stop in Jerome, an arty community nestled on the side of a hill.  Literally...it was on the side of the hill.  Getting there was a little hairy as I had to traverse up several switchbacks.  I was glad I didn't have to go up it in the dark.

Looking down from Jerome
The view from Jerome

leather shop
The whole town was full of art galleries and shops.  This shop on the corner was a leather shop.

jerome
Another gallery

ruin

grand hotel
At the very top of the hill is the Jerome Grand Hotel.  I was told I should definitely eat dinner there at the Asylum restaurant. 

looking down from grand hotel
The view of Jerome from the tippy-top...at the Grand Hotel.


This rusty vintage automobile was sitting in the parking lot of the Jerome Grand Hotel.  Loved it!

the asylum
I'm not sure if it is always decorated this way, but as I was visiting on October 23rd, the Asylum restaurant was totally decked out for Halloween.  The waiters/waitresses were in costume.  It was great.  I don't recall off-hand what I ate, but I do remember that it was good.